The Easiest Way to Replace a Broken Nothing Phone (1) Rear Glass

Broken rear glass on an Nothing Phone (1) is a distressing sight. Use this Phonefix guide to replace the rear glass on your Nothing Phone (1). You’ll need replacement adhesive to reattach the rear glass when reassembling the device. Today, we would like to show you how to do it. Now let's get started.

Step 1. Heat the rear glass

    • Prepare an iOpener and apply it to the rear glass for at least two minutes to loosen the adhesive underneath.

    • A hair dryer, CP-401 heat gun, or hot plate may also be used, but be careful not to overheat the phone—the display and internal battery are both susceptible to heat damage.

  • Step 2. Insert an opening pick

    Nothing Phone (1) Rear Glass Replacement, Insert an opening pick: step 2, image 1 of 3
    • Secure a suction handle to the bottom edge of the rear glass, as close to the edge as possible.

    • If the rear glass is cracked, the suction handle may not stick. Try lifting it with strong tape, or superglue the suction handle in place and allow it to cure so you can proceed.

    • Lift the rear glass with the suction handle to create a small gap between the back cover and the frame.

    • If you're having trouble creating a gap, apply more heat to further soften the adhesive. Follow the iOpener instructions to avoid overheating.

    • Insert an opening pick into the gap you created.

    • Slide the opening pick to the bottom right corner to slice the adhesive.

    • Leave the opening pick in place to prevent the adhesive from resealing.

  • Step 3. Slice the adhesive   Nothing Phone (1) Rear Glass Replacement, Slice the adhesive: step 3, image 2 of 2

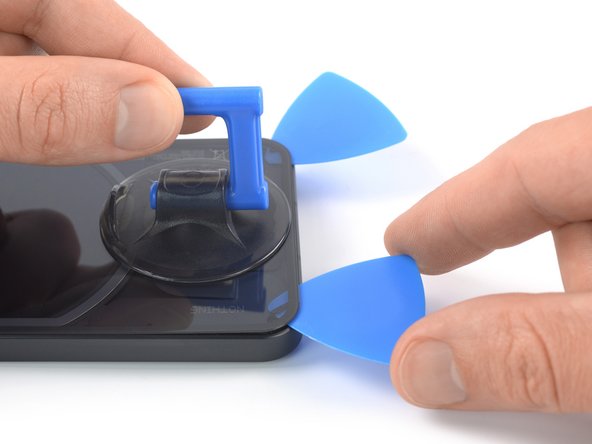
    • Insert a second opening pick at the bottom edge of your phone.

    • Slide the opening pick to the bottom left corner to slice the adhesive.

    • Leave the opening picks in place to prevent the adhesive from resealing.

  • Step 4. Slice the adhesive   Nothing Phone (1) Rear Glass Replacement, Slice the adhesive: step 4, image 3 of 3

    • When you slice near the glyph, insert only the tip of the opening pick (~2-3 mm) to avoid damaging the LEDs.

    • If the adhesive becomes hard to cut, it has most likely cooled down. Use your iOpener for one to two minutes to reheat it.

    • Insert a third opening pick at the bottom left corner of your phone.

    • Slide the opening pick along the left edge of your phone to slice the adhesive.

    • Leave the opening pick in the top left corner to prevent the adhesive from resealing.

  • Step 5

    Nothing Phone (1) Rear Glass Replacement: step 5, image 1 of 2
    • Insert a fourth opening pick underneath the top left corner of your phone.

    • Slide the opening pick along the top edge to slice the adhesive.

    • Leave the opening pick in the top right corner to prevent the adhesive from resealing.

  • Step 6

    Nothing Phone (1) Rear Glass Replacement: step 6, image 1 of 2
    • Insert a fifth opening pick underneath the top right corner.

    • Slide the opening pick along the right edge of the rear glass to slice the remaining adhesive.

    • At this point, the rear glass should be separated from the frame. If there's still resistance around the edges of the glass, use an opening pick to separate any remaining adhesive.

  • Step 7. Remove the rear glass

    Nothing Phone (1) Rear Glass Replacement, Remove the rear glass: step 7, image 2 of 2
    • Remove the rear glass.

    • Apply new adhesive where necessary after cleaning the relevant areas with isopropyl alcohol (>90%).

    • Since the rear glass of the Nothing Phone (1) is transparent a dust blower may come in handy for cleaning before installing a new rear glass.

    • Secure the new back cover with pre-cut adhesive or double-sided adhesive tape. After installing the back cover, apply strong, steady pressure to your phone for several minutes to help the adhesive form a good bond—a stack of heavy books works well.

  • Hope that you will solve issues replacing Broken Nothing Phone (1) Rear Glass after reading this post. By using Phonefix cell phone accessories replacement, things will get much easier. If you have other questions, please feel free to leave us a comment below.

    Also Read:

    Nothing Phone (1) Review: Buy or Not?


    Comments

    Popular posts from this blog

    Broken iPhone Screen: DIY Repair or Pay a Fix-It Shop

    iPhone Water Damage Repair Options: Cost-Efficient Solutions

    How to fix iPhone no sound?