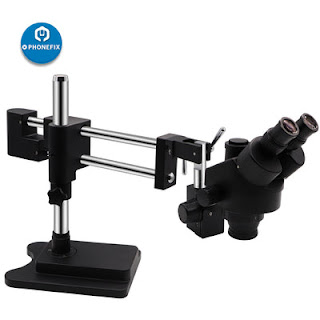
All details about Double Boom Stand Stereo Trinocular Microscope
Today, we will share you the most popular Double Boom Stand Trinocular Stereo Microscope of 2021.
Many people hold great interests in Microscope. They are confusing in how to use it quickly and correctly. So, we made the video demonstrates how to use a microscopes step by step.
In general, the Binocular and Trinocular Stereo Microscope was adopted frequently in tabs and for Mobile Phone Motherboard Inspection and Repair Working.
Now, let learn about the Double Boom Stand Stereo 3.5X-90X Trinocular Microscope.
With the trinocular port design, its magnification reaches 3.5X-90X, which can meet most welding and specimen observation requirements.
So you can use it in mobile phone repair, medical equipment repair, school biological lab, etc.
The Double Boom Stand Stereo Microscope Supports to install VGA Video Camera, and the microscope features a unique simul-focal optical system, enabling well-focused clear images on your video screen.
At the same time, the microscope obtains sharp, focused images with the help of the 30mm super widefield high-eyepoint eyepieces and 0.7-4.5X Objective, 0.5X or 2.0X Barlow Lens as well.
About is specific working parameter:
Its Working Distance is 8" (about 200mm), Zoom Range is 26:1, Maximum Field of View is 2-1/2" (65mm), Minimum Field of View is 3/16" (2.5mm)
So it is a great choice for school tabs and for Mobile Phone Motherboard Inspection and Repair Working.
There always lots of high point wide field Eyepiece and various objective lens, and Auxiliary Lens as well with different magnification for Option.
You can buy every Microscope accessory in the video by connecting our China Phonefix Team salesmen.
Now, let start the installation.
It consists of four parts-setting up the microscope, using the microscope, troubleshooting hints, and cleanup.
Retrieve a microscope from the cabinet. Carry the microscope with both hands, one holding the arm and the other under
the base of the instrument. If the microscope is too heavy for you to carry safely, ask for assistance.
1. Unwind the cord from the back of the microscope and plug it in. The on/off switch is on the back of the scope, and may be hard to find if the power cord is still wrapped around the holders.
2. Check the ocular lenses and turn them until the number 64 lines up with the white line below the rotating part of the lens.
3. Check that the condenser lens is just below the stage. Put the objective lens on low power and move the stage to its highest position.
4. Adjust the light to the medium or medium high range. You can adjust the light later to improve the image. The brightest light doesn't necessarily result in the best image.
Now get ready to start using the microscope.
1. Open the clip on the stage with one hand and slide a microscope slide to the back of the stage. Be sure the slide doesn't go under the clips that hold it in place.
2. Use the knobs on the lower right side of the stage to center the specimen over the condenser lens. Start with the low power objective lens(4X) and the stage in its highest position. Then unlock through the ocular lens and focus on the specimen, which should already be nearly in focus.
3. Once you have found the specimen on low power, be sure it is centered in the field of view. Then move to the next highest objective lens (10X) and refocus.
4. Your specimen should be nearly in focus, and you should only need to use the smaller, fine-focus knobs. Again, center the specimen and you are ready to move to the highest power lens(40x).
Troubleshooting
1. If when you move to a higher power lens, the specimen becomes blurry as though it were coated with Vaseline and you cannot focus, you may need to clean the lens.
2. Soak a piece of lens paper (and only lens paper) with lens cleaner and wipe the lens. Then wipe dry with clean lens paper. Repeat a couple of times. If this doesn't solve the problem, check with your instructor.
Cleanup
1. When you have finished using the microscope, remove the slide, and rotate the lowest power lens in place. Move the stage to a centered position and slide holder to the left.
2. Check that the stage is clean and dry. Turn off the light and power and wrap the cord. Carry the microscope with both hands back to the cabinet. Be sure that the arm is facing out and that the microscopes are not crowded together.


.jpg)
Comments
Post a Comment